Sunday, March 23, 2014

Making Maple Syrup - Our First Boil - March 23, 2014

Maple syrup season is delayed by two to three weeks this year due to the unseasonably cold temperatures.  It certainly does not feel like spring has arrived.  We've had some nice days where it went above zero and we were able to collect sap, but most days it was running pretty slowly.  Sap will spoil just like milk if it is not kept chilled and boiled within 7 days.  Since there was a cold snap coming up we wanted to boil what we had rather than risk it spoiling.  Read on below to see how we started with this:


....and ended up with this:


Below is our log for the past week of sap collecting:

March 19 - 5.25 cups. Weather: Sunny, high +6.8°C ( in the sun), low -10.9°C
March 20 - 6.00 cups. Weather: Cloudy, high +4.8°C, low -3.5°C, 6.6mm rain
March 21 - 4.50 cups. Weather: Sunny/Cloudy, high +5°C, low +.7°C, .3mm rain
March 22 - 22.75 cups (woo hoo!). Weather: Sunny, high +5.5°C, low -3.2°C
March 23 (by middday) - 13 cups. Weather: Cloudy, high +4.7°C, low -6.8°C

Jeff collected an additional 16 cups by the end of the day on March 23, but we are freezing that and will use it in our second boil.

Total for first boil: 51.5 cups (or 3.22 gallons) from six trees.  We have three or four more trees we are going to tap (in our neighbour's yard) but Jeff had to get some more buckets and spiles.  We'll probably tap those trees this coming Friday as it's supposed to be above zero.

First, some more pics of the sap and sap buckets, since I love taking pics. :)


This is what we had at the beginning of the day on Saturday.  It was just over 2 1/2 gallons.  As we were boiling, Jeff continued to collect sap and gathered another 13 cups to add to the pot.


Since you don't want to boil sap inside your house (hours of boiling produces lots of sticky steam), we used an outdoor propane stand fryer, often used for lobster boils and corn boils.  It is 60,0000 btu's. We first started using it in the driveway but it was very windy and it was having a detrimental effect on the heat getting to the pot.  So we decided to move the whole production to our now-empty wood shed, which is just a lean-to surrounded by tarps.  This worked great and it was a nice sheltered spot to do the boil.


We used a stainless steel roasting pan that was about 5" high and 14x12".  We started by adding about 4 inches of sap.


Once the sap boiled down a couple of inches, we would add more sap that had been preheated to the boiling point in a pot on the kitchen stove.  Adding preheated sap keeps the boil going constantly.


Since this was our first time doing this, we didn't really know how long it would take to go down or what to expect so we took turns babysitting the boiling sap the whole time.  It was kind of fun actually, kind of like sitting around a campfire except you are mesmerized by boiling sap rather than yellow flames. lol


Once all of our sap had been added to the roaster, we started to watch the temperature.  You have "syrup" when the temperature has reached 7.1°F over the boiling point of water, which was 212°F.  So we would be watching for a finish temp of 219.1°F.  Just before it got to that point though, we brought it into the house and transferred the pre-syrup to a smaller pot, at the same time filtering it through cheesecloth to remove some of the larger particles of sugar sand.


Once the temp of 219.1°F had been reached, we used cone coffee filters to filter it again into a measuring cup.  The final yield was just about 1 1/2 cups.  However it seemed quite thin and we had our doubts it was the correct consistency for syrup, so we put it back in the pot and boiled it down to a temp of 220°F.  Then we filtered it again into the measuring cup.  Every time you filter you lose a little bit of syrup in the filter.  Determined not to lose anymore syrup, I made the mistake of squeezing the filter with tongs to squeeze out the last drop of syrup.  Big mistake...when I did this, I saw cloudy sediment go back into the measuring cup.  So I filtered for the third time....losing even more syrup. lol  At least it came out crystal clear this time.  Next time I'm not touching the filter at all.


This is the end product.  After boiling it down again and filtering three times, we were left with about 1 1/4 cup of crystal clear, amber-coloured syrup.  We had it on our pancakes for supper that night (yes, we had pancakes for supper...lol) and it was delicious.


Now that I had the final quantity of syrup, I was able to figure out the sugar content of our sap.  Sugar Maples have an average of around 2 to 2.5% sugar in their sap, whereas other maples often have less.  We have mostly Norway Maples (we think), and one what we believe is a Manitoba Maple but without leaves we won't know for sure until summer.  Manitoba Maples are supposed to have quite a bit lower sugar content.

Using the "Rule of 86," the number of gallons of sap we would need to produce one gallon of syrup is equal to 86 gallons divided by the percent of sugar in the sap.

So if you start with sap that is 2% sugar, you would need to evaporate 43 gallons of water (86 gallons /2% = 43 gallons) to make one gallon of syrup.


Since we had only gathered 3.22 gallons of sap (equal to 51.5 cups), I will use cups in the formula instead of gallons.  We had 51.5 cups of sap that produced 1.25 cups of syrup.  51.5 /1.25 = 41.2.  86/41.2 = 2.09% sugar.  I'm happy with that. :)  Also of note is that we had a day of rain where rainwater ran down the tree trunks and dripped down the spiles into the buckets so that day we definitely had rainwater diluting our sap.  We have thought up a remedy for that problem for the next time it rains so hopefully we will not have any rainwater in our sap again and I'll do another sugar percentage calculation after our next boil.

This is a great hobby to help get through winter.  And once maple season is over fishing season will be in high gear!


Sunday, March 16, 2014

Tapping Maple Trees in Our Yard to Make Syrup

A few weeks ago, Jeff and I were out wheeling with a friend who showed us an abandoned sugar shack in the woods near his house.  He said it hasn't been used in many years, and the building that housed the boiler had collapsed years ago.  There were lots of buckets and spiles in the old shack, and Jeff and I decided to take some home to tap the trees in our yard.  Below is a picture of the shack.  It is rotting out pretty bad and mice have taken it over.


The pic below is the building that used to house the boiler.


Most of the buckets and spiles were in pretty bad shape, but I figured some steel wool, bleach, wash and rinse could revitalize them.  Unfortunately there were no lids for the buckets, and if it rains rainwater will dilute the sap which will require extra boiling time so we needed to get lids.


The buckets and spiles cleaned up nicely.  I soaked them in bleach and then scrubbed them down with an abrasive sponge.  I used the abrasive sponge on the spiles too and cleaned inside them with Q-tips and alcohol and then gave them a good wash with dish soap.  They cleaned up pretty good.

We waited and waited for warmer temps (when never seemed to come - this is the longest winter ever), as the temperature has to rise above zero during the day and fall back below zero at night for the sap to run.  Yesterday it just reached the zero mark and was sunny so we decided to tap the trees.

Jeff and his daughter Becca headed out into the yard with the drill, hammer, spiles and buckets.  They picked out the maple trees that were larger than 10" in diameter, and drilled holes on the south-facing sides of the trees.  These trees are really only large enough for one tap, but we put in two taps anyway as I read it will not harm the tree, it will just use up "tap real estate" for future years and could possibly make the taps run slower.  We'll see how it goes and next year may only just put in one tap in each tree.


Even though it was hovering around the zero mark, the bright sunshine on the trees got the sap flowing as soon as the tap was put in.


We were pretty excited. lol


It is supposed to rain later this week so I had to think up something fast for the lids.  A plan came to mind...I took a wire coat hanger, and bent it out straight.  Then I worked it into a circle slightly larger than the top of the buckets.  Next I cut up a tarp into pieces and taped it with duct tape onto the coat hanger.  On the front edge of each one I taped in a large nut and bolt to give some weight to the lid so the wind wouldn't blow it up.

Below is the "prototype" first lid.  It worked well so then I made lids for the rest of the buckets.  


Unfortunately Becca has to return home tomorrow and will miss out on the production of maple syrup and other maple goodies.  So we decided, just for fun, that we'd collect whatever sap had gathered in the 8 buckets and boil it off just to make even a teaspoon of syrup so she could try it.  The buckets had only been on the trees for about three hours when Jeff and Becca collected the sap.  They strained it through cheesecloth into a container and ended up with 1 1/2 cups  of sap.  We put it on the stove to boil, and a short time later had a teaspoon or so of syrup that we could all try.  We let it go a bit too long actually and actually had taffy rather than syrup, but it was really good!

Once the sap really starts running good we will be doing the majority of the boiling outdoors on a propane stove as boiling inside can make for sticky ceilings and walls and too much humidity in the house.

Tomorrow is supposed to be another cold snap, with the high only being -8 no sap will be running.  It's not supposed to warm up again until Wednesday so hopefully we'll be able to start collecting sap again then.  I'll do more blog posts on our sap collecting and syrup production as the season goes on.  The season lasts 4-6 weeks.

Saturday, March 1, 2014

Scamper Engine Upgrades

Since we bought the Scamper in 2011, we do a little bit every year to improve it. Below is the engine (original 390 FE), the day we brought it home. It had some bad oil leaks which we planned to take care of when we could afford it. In the meantime, we'll just keep adding oil and watch it carefully.


The first year it got a much-needed starter and alternator. It worked pretty good that summer and we had 2 or 3 trips in it. It was hard to start though, and it would cough and sputter sometimes when driving it so we we're pretty sure the carb was gummed up and probably needed a carb kit, and also a tune-up.

Next, Jeff painted the air cleaner.


In 2012 we got rid of the points and got a Pertronix electronic ignition and Flamethrower II coil, plugs, wires, dist. cap and rotor button.


I gave the engine bay a good cleaning too (top pic - before, bottom pic - after).


When it came out of winter storage in 2013, we decided to tackle some of those oil leaks and the carb issue. It appeared to be leaking badly from the intake manifold, and antifreeze was also leaking from the intake as well. I stuck our little Olympus camera in the back of the engine to take pics where I couldn't see. This is what it revealed....the intake manifold looks like it has a crack in it and the oil leak is obvious.


We also had bubbles in the antifreeze in the rad, which could have meant a leaking head gasket.


Our mechanic tested it for combustion gasses and luckily it didn't have any so the head gasket wasn't leaking. That was good news. We figured the crack in the intake was the cause of the bubbles.

After doing a lot of reading on the old Ford truck forums (mostly fordification.com) we decided to upgrade to an Edelbrock Performer 2105 aluminum intake manifold, Edelbrock Performer 1406 600cfm 4-barrel carb, water pump, thermostat housing, and passenger side exhaust manifold (old one was cracked).

In the shop - the work has begun. Here is the engine with the old intake and valve covers removed.


The new intake installed.


Jeff used our mechanic's varsol tank to clean the valve covers of grease and oil. Below are the valve covers after being cleaned in the tank:


Jeff then sanded them down with a wire wheel.


Here they are ready for paint:


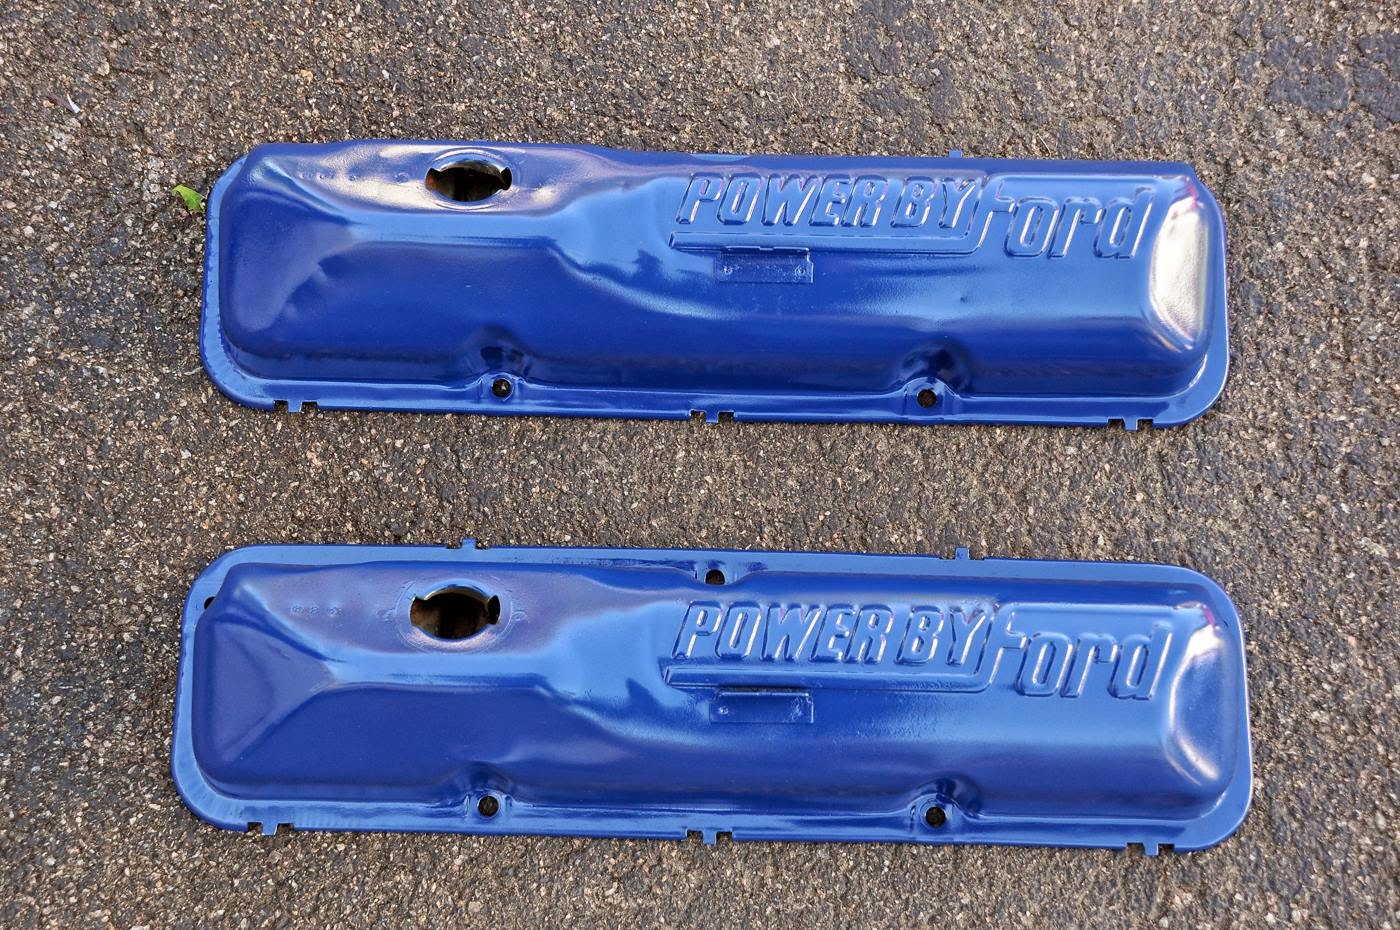
Painted in Dark Ford Blue. Here are the finished covers. Jeff did an awesome job with these:


The engine now has the new carb installed, ignition components and freshly painted valve covers. Next to install is the water pump and air cleaner.


When our mechanic took the distributor out, he said there was a lot of play in the timing chain and we should really get a new set, so we did. We got an Edelbrock Performer-Link 7808 double-roller timing chain and gear set. When he took the old one out, he said it was a good thing we changed it and showed it to us...it was all chewed up and teeth were even missing.


This is a perfect example of things start to snowball. We needed a new intake manifold, and that led to all these other things. The water pump had a lot of play in it....best get a new one. The timing chain was slack, best replace it....etc. etc. So if you're wondering why we didn't upgrade the cam, well that's because you have to draw the line somewhere!

The final pic:


The end result after all these upgrades:

1. Starts right up every time now.
2. Tons more power.
3. Fuel economy is about the same after one trip, but the carb needs to be adjusted as it's running rich.

The new passenger side exhaust manifold cracked after the mechanic warmed it up the first time. He said this probably means the head is warped. The options are to take the head off and machine it flat or get a new head for it. For the time being, we've put some FireSeal 2000 on the crack it and it's still holding after about 2000kms. We're going to keep doing this as long as we can....if it works, why not?

Below are links to all of my posts about the Scamper:


Wednesday, January 29, 2014

The Inadvertant Sodium Experiment

Jeff and I have been doing fantastic on our new diet and exercise regime, losing weight at a regular and consistent rate.  We've been paying attention to our calories, fat, carbs and protein but have not paid any attention to sodium.  

We've always been told that too much sodium is bad for us. Too much sodium in your diet can cause your body to retain fluid which can lead to high blood pressure, which puts you at higher risk of stroke, heart disease and kidney disease. Whenever you have high blood pressure, it causes your heart to have to work a lot harder and it can cause damage to blood vessels and the heart muscle itself. So too much sodium is definitely a bad thing, but our bodies still need some sodium to function properly.

Sodium is an electrolyte, and our bodies need electrolytes to control blood pressure and blood volume.   Sodium is also important for normal nerve and muscle function.  However a person in our age group (late 40's) should only have between 1500 and 2300mg of sodium per day.  One teaspoon of table salt has 2300mg.

Last night for supper, we had wonton soup...two bowls each. 


This morning when we got up and did our regular weigh-in, we were shocked to see that we had both gained weight - significantly.  Jeff gained two pounds, and I gained a pound and a half.  That's when it hit me that we probably had too much sodium last night and were retaining water.

Our delicious wonton soup had about 1000mg per bowl....and we each had two bowls.  We also had popcorn with popcorn seasoning (which is salt) and that's an additional 485mg.  Adding up the sodium we had in the rest of our meals yesterday, we both had between 3500 and 4000mg of sodium.  So due to all the excess sodium Jeff and I ate yesterday, our bodies retained water and it showed up on the scale this morning.  Even though it resulted in weight gain, it was kind of a neat experiment to see the effects of salt on the body.  Today we worked out hard - I did extra time on the treadmill and increased the speed to sweat out that extra sodium and water.  Hopefully tomorrow we'll see weight loss again after all the sweating today.

FYI, the following foods are known to be high in sodium:
  • Foods made in brine (pickles, olives, sauerkraut)
  • Salty and Smoked Meats (bologna, corned beef, bacon, ham, sausage, lunch meats)
  • Salty and Smoke Fish (anchovies, caviar, dried fish, smoked salmon, sardines, herring)
  • Snack/Junk Food (potato chips, pretzels, popcorn, salted nuts, crackers)
  • Condiments (season salts, Worcestershire, soy, barbecue, ketchup, mustard, teriyaki, mustard)
  • Cheese
  • Salad Dressing
  • Soups (canned or instant)

Thursday, October 3, 2013

1971 Scamper Upgrades - Electrical

The wiring in our Scamper had already been upgraded to white wire and a breaker panel.  There were still a couple of places where there was still some of the old orange wire but 75% of the wiring has been converted to white wire.

A couple of things needed fixing however, such as the outdoor outlet.  The old one didn't work anymore  and when I took it apart I found that it had shorted out and melted the plastic of the outlet and the wires were broken.  I bought a new outdoor outlet and installed it.  There really should have been a GFCI outlet installed here, and I did buy one, but it wouldn't fit in the existing hole and I didn't feel comfortable cutting the siding and wall material of the camper to make it larger.  The outlet I did install is weather proof, and we would never use it in a wet situation anyway.


The electrical outlet behind the fridge did not work either, and it looked as though it had gotten wet and corroded.  The weatherstripping was gone from the fridge access panel, and that is how water would have gotten in, especially while driving in the rain.  I replaced the weatherstripping so the panel was now weather-proof.  Then I replaced the old outlet with a new one.  Below is the old outlet, and it was replaced with one similar to the one above.  We can now use the fridge on electrical power if we ever need to.


Next, we wanted a 12-volt outlet that can be used in the back of the camper.  There was a 12-volt wire that was capped off under the sink cabinet.  I checked it with a multimeter and it was live with 12-volts running through it.  I bought a dual 12-volt outlet that also has a USB outlet and installed it on the panel just outside the cupboard.

The wiring:


The new outlet installed:


Once I had it wired up and turned the power back on, I saw something disappointing.  There is a small light around the usb port, kind of like a nightlight.  It looks like it is LED so it shouldn't use much power.  However as we boondock a lot we hate having parasitic power-robbing devices like this.  On the plus side, there is a breaker on our power converter that controls only this circuit.  So we can keep that breaker turned off until the outlet is needed.

The next upgrade was the kitchen light.  While Mom, Suzanne and I were away in Cape Breton in August on our trip, the 42-year-old light finally bit the biscuit.


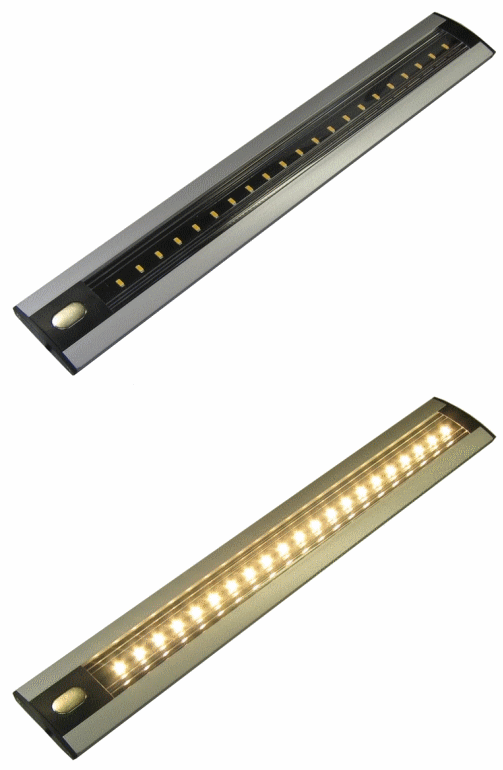
I at first assumed it was just the fluorescent light tube that needed replacing, but when I got home I checked the bulb for continuity with my multimeter and found that the bulb was good.  That meant that the ballast was probably bad, and replacing the ballast looked like was going to cost around $40-50.00.  I instead opted for a new $60.00 modern LED under-cabinet light from Command Electronics, specialists in 12-volt lighting.  It is aluminum, very low-profile, and has 21 warm white LEDs that produce 350 lumens, with only a .32 amp draw.  The old light produced 400 lumens, and had an amp draw of .8 amps.  The new light is more than twice as efficient as the old one, and any way we can save an amp that is a good thing.  Below are some pics of the new light.


Instead of centering the light over the hole for the wires, I put it closer to the outside edge.  Even though this leaves the hole exposed, it puts the light more centered over the counter which is where it is needed most.

Below are links to all of my posts about the Scamper: