July 14, 2011
I subscribe to the Amherst Buy and Sell Facebook Group, and I see things for sale posted in my news feed all the time but never pay much attention to it. On July 13, 2011, I saw a beautiful old RV listed for sale and after I read the ad, I hollered excitedly to Jeff and told him to go on the Amherst Buy and Sell site right now and look at the RV for sale.
The funny thing is, other than stating to each other that we were getting tired of tenting and our tenting days were soon over, we had never ever discussed buying an RV. However on this day it seemed that we were reading each other's minds as we never even discussed it...Jeff got on the phone right away and called the number in the ad and made plans to see it the next day.
On our way there, I told Jeff I was half expecting it to smell like mold and mildew being that it was a 1971 model and probably had leaks. However we were pleasantly surprised - it didn't smell at all. We just loved the camper, took it for a test drive and fell in love with it even more.
It is a 1971 Scamper, built on a Ford F350 chassis cab truck with a walk-through (cutaway) from the camper to the cab of the truck. These campers were made by Pre-Built Mfg. in Lethbridge, Alberta. The truck had 115,000 miles on it.
Below is a video of the previous owners showing us around the Scamper, and us taking it for a test drive.
So after the test drive, Jeff and I both loved it and wanted it. Even though the interior of the camper really needed some freshening up, I was already having visions on how I was going to add my personal touch to it and make it "ours". So after some negotiating on the price, it was a done deal and we drove her home!
After we got it home, I took some pics of the interior.
There was a double air mattress in the cab-over bunk. I found it extremely uncomfortable and I would never get any sleep when I slept on it. We remedied that last summer (2012). I had two single self-inflatable air mattresses - very thin but good insulation factor. I put those on the floor of the bunk, side by side, as a base. Then I bought two 1.5" memory foam toppers at Wal-Mart and put those on top of the air mattresses. That made the biggest difference in the world! I sleep like a log now and I think that bunk is even more comfortable than our own bed.

The kitchen is fully equipped, with propane appliances (fridge, stove and oven) and they all work. It has a Hydroflame radiant heat furnace, which is vented to the outside to both draw in fresh air for combustion and also to vent the exhaust gasses outside. I started the furnace up and it works great. We have a CO detector and I ran the furnace for 3 hours with the detector inside, and checked it every half hour to make sure it was working right and that the detector didn't go off. The furnace worked perfectly, and the CO detector never went off. To be extra safe before we ever use this heater I would like to get a propane detector too. We like to boondock camp (not in campgrounds) so this type of furnace is perfect for this type of camping. The furnace uses no electricity whatsoever, so it will not run down the house battery.
This is a heater for using when the truck is running. There are hoses that run from the engine to this little radiator. It works too.
I had lots of ideas on what I wanted to do with the interior. Below is a list of everything we did:
- We primed and painted all the wall paneling, the fridge, the drawer fronts and cabinet doors on the right side.
- My mom helped me mactac the kitchen cupboard panels with a dark brown checkerboard-type mactac.
- I painted the bench by the door and the outer panels of the dinette benches dark brown.
- I made new curtains for all the windows. Jeff and I went to the fabric store and picked out the material together. We chose a dark brown checkerboard type of material, and I lined the backs of the curtains with white thermal backing. This helps keep the heat out in the summer, and keeps the heat in when it's cold outside.
- I also made new covers for the all the bench cushions. Jeff helped me pick out that fabric too. We found a nice fabric on sale that had dark brown stripes to match the curtains and beige stripes to match the walls, and it also has pale yellowish-green stripes that match the table and counter-top. It complemented the decor perfectly!
- The final touches for the interior were some fake plants (velcroed to the shelf), a rug outside the bathroom door, and new bedding that matched the rest of the decor.
Below are the "after" pics once all our decorating was done. The one thing we wanted to do but never got around to it yet is replace the vinyl floor tiles with new ones that match the new decor. We might work on that this summer.


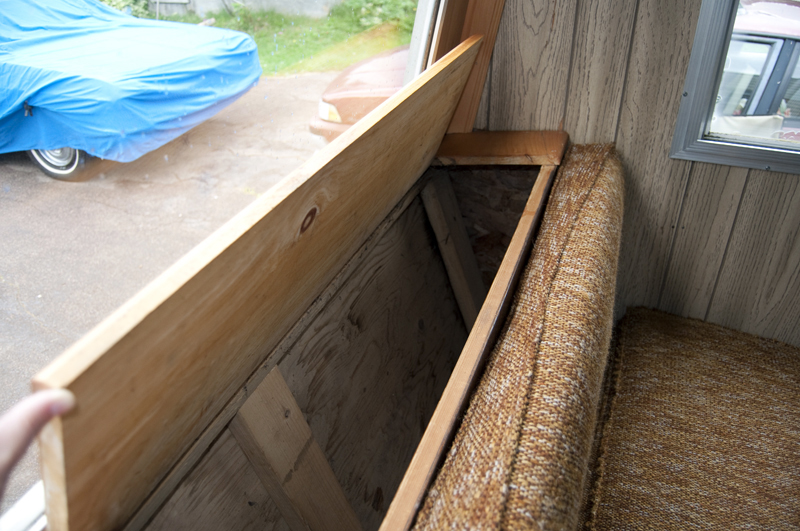
One problem we encountered after our second trip in the Scamper was the dump valve. It broke, but luckily it broke AFTER the black tank had been dumped and rinsed. I am on a vintage RV forum and I posted on there asking if anyone knew where I could get a dump valve like this. Everyone who responded said they were obsolete and I would never find one. I then got in touch with a gentlemen who used to build Scampers, and I sent him some pics of the old dump valve and asked him how I go about replacing it. He wrote me back and said "my God, I haven't seen one of those in about 30 years." He was very surprised that it still functioned up until our last trip. So he told me which dump valve I should buy, and gave me detailed instructions on how to install it. The dump valve I was supposed to get had an elbow at the end which angled downwards. However the RV dealer ordered in the wrong one (a straight one, with no elbow) and I said the hell with it I'm not waiting two weeks for another one so we put this one on anyway. The downside is it's a bit more difficult to hook on the sewer hose.
This is the old dump valve:
And this is the new one. We've used it many times and it works great.
Below are the specs on the chassis of the truck. It's a Ford F350 dually, with a 390 FE engine. It has an Autolite 2100 carb (which currently needs replacing). It has a Dana 70 rear-end.
I was doing some searching on the internet about Scampers, and I found this brochure. This brochure is for a 1970 model and ours is a '71, but they're pretty much identical. The interior layout is a bit different. However it was great finding this brochure as it gave all the specs of the camper such as it's tank capacities, length, height, construction, etc.
Below is the truck's owner's manual compared to our 2011 Hyundai Elantra's. Quite a difference!
The spare tire under the camper was in really bad shape - we'd never be able to use it so we bought a good used one last year.
The truck was painted about ten years ago, and the painter sprayed over the emblems. I've read that the emblems can be very brittle and difficult to get off without breaking them on vehicles this old, so that is probably why the decision was made to paint over them. I bought some chrome-coloured paint and black paint, and used one of my artist's brushes to hand paint the emblems to make them look better than they were.
This is Jeff changing the oil. Look at the door of the truck...these old Ford trucks are known as "bumpsides" or "bumps" because of the raised ridge on the sides of the truck. Only the 1967-1972 era Ford trucks have these "bumps."
Our neighbour just happened to have a 1971 license plate in his shed and he gave it to us. I love having the vintage plate on the truck and think it really suits it.
Jeff really wanted to get a set of half-moon headlight covers for the truck, so we ordered these off Ebay last summer. I think they really suit the truck!
I love old stuff, and I had this little washboard in the basement. I thought it would be a great thing to keep in the camper. It is velcroed to the wall (in a house on wheels velcro is your friend!). I figured if we ever ran out of underwear while on a trip at least we've have a way to wash them. lol
Another thing we wanted to do to the truck was spruce up the engine a bit. I degreased the engine with engine cleaner, then we wanted to paint the air cleaner and valve covers. Here is what the engine looked like before:
First we cleaned up the air cleaner with a wire wheel and got all the rust and old paint off it. Then Jeff sprayed it with Dark Ford Blue engine enamel.
I ordered a new air cleaner decal for it, and here is the finished air cleaner back on the engine. We didn't do the valve covers this year as that's a pretty big job we weren't ready to tackle yet.
People kept asking us if we had named the camper yet, and we hadn't...we figured let's just use it and maybe one day a name will come to us. Well the name did come to us on the Margaree River last summer. We were salmon fishing and I said to Jeff we should name the camper "Shady Lady". A Shady Lady is a type of salmon fly. We got our friend to make us up some "Shady Lady" decals for her and here they are installed:
And lastly, below are some pics of her in action:
Every year the son of the camper's prior owner lets us store it in the garage where it has slept every winter for the past 12 years.
Here is a short video of her coming out of winter hibernation last year. Jeff pumped the gas pedal a bunch of times and after cranking it for about ten seconds she started right up.
In spring of 2015 we replaced some sections of floorboard and put new sticky tiles down:
Below are links to all of my posts about the Scamper:
Scamper Floor Repair and Floor Covering Replacement
1971 Scamper Upgrades - Propane Regulator and Norcold N300.3 Fridge Install