Sunday, July 19, 2020

Flounder Fishing at Spencer's Island, Nova Scotia

Today was a long day but an awesome one!  Jeff and I went Flounder fishing at Spencer's Island on the Bay of Fundy.  It's about an hour's drive from our home in Springhill.  Because of the extreme tides in the Bay of Fundy, we have a four-hour window to get our boat in and out of the water: Two hours before high tide for the put-in, and two hours after high tide for the take-out. I'm not a morning person so we got there late, a hour before high tide.  If we ended up being late getting back to the boat ramp, the tide will be out too far and there will be soft sand between the boat ramp and the water's edge.  Our friend Dan, who has a camp there, said not to worry if we were late getting back in - he'd come get the boat with his four-wheeler. 

So off we went, and had a great day fishing.  We got our limit (10 fish each, all over 12" in length (the minimum size), and some were between 14 and 16 inches.  


Sorry for the poor photos...there was a big fingerprint on the GoPro's lens. lol

After we caught our limit (10 fish each), we went for a rip around the island and out further into the Bay.  Jeff wanted to drive into the rip currents to see what it was like.  They were pretty mild at this point in time and location, but it was really weird being in the midst of it - the currents go in all directions with some totally flat calm spots in the middle.  


Below is a short video of us motoring through the rip tide.


We came back 2 1/2 hours after high tide. The boat launch was high and dry. Dan was watching for us and he was already on his way over with the four-wheeler. Jeff brought the car down the ramp and disconnected the trailer and got it into the water. It's a good thing Dan was coming though because our straps couldn't reach the boat. So I was standing there holding the boat in the water, with one task to do to while Jeff and Dan got the bike and trailer situated...I was supposed to keep pushing the boat out into the water as the tide went out to make sure it didn't end up high and dry. The tide goes out extremely fast here. 

Then I see this white van coming down the boat ramp and it stopped in front of our car. It was our friend Dwight, his girlfriend Joanne, his mom and uncle. They were out for a Sunday drive, and pulled into Spencer's Island. He said he was telling them as he pulled in that his friends Jeff and Cindy were down here fishing flounder a couple of weeks ago. When he pulled up to the boat ramp there we were, with a cooler full of flounder! haha 


Anyway I got distracted talking to them and failed at the one job I had to do...keeping the boat in the water. It was high and dry on the sand. It took three of us to push and twist the thing to get it back in the water because it's heavy. So Jeff got the boat onto the trailer and Dan tried to pull it out. His bike struggled in the sand trying to get it out of the water because the sand was so soft. He was having a hard time getting traction and the trailer wheels were sinking in the sand. He eventually got it though and hauled it out for us. I was worried there for a bit, thinking we'd have to leave it and come back at 10pm to get it when the tide came back in. 

After that we went to Five Islands to buy a good filleting knife and skin puller. While there, we also went to a new restaurant, called "Briny Bay Cafe". We had clams and chips, and sundaes for dessert. The clams and fries were cooked to perfection and delicious!  So many restaurants overcook their clams or have them in too heavy of a batter, but these were perfect.  They also have a wood-fired pizza oven and the staff raved about the pizza, so we ordered one to take home. We taste-tested it while it was still hot, and it was amazing! Jeff said it's the best pizza he's ever had. So needless to say we'll be going back there for sure! 

We got home around 6:30 and Jeff started filleting the fish.  We had 20 fish so it took him a few hours - it's only his second time doing it.


I was vacuum-sealing them by the pound as Jeff filleted them. We ended up with 6.5 lbs of fillets.  


Sunday, November 20, 2016

Scamper Floor Repair and Floor Covering Replacement

Every year we do some upgrades to the Scamper.  It gets better with age!  In the spring of 2015 after we got the camper out of storage we decided to tackle the floor.  There was a depression in the floor in front of the shower so we were sure there was some rotten flooring there.  We wanted to tear up the old sticky tiles, replace the rotten section of flooring and put new tiles down.

We started by using a prybar and hammer and ripping up all the old tiles.  They were stuck down really good after being on there for many years.


There was a piece of rotten flooring right beside the door.  We cut out a new piece of plywood and replaced that small section.


This was the section by the bathroom.  The tiles were impossible to get up in this one spot so we cut out a hole with a jigsaw.  We found that the floor wasn't rotten at all - it had already been replaced before but the studs were not screwed to anything, they were just resting on the metal subfloor.  We put new studs in and screwed them to the other ones.


Then we replaced the plywood with a new piece (even though the old one wasn't rotten it was full of screw holes and cracked).


After that we put some floor leveler over it all to fill the cracks and even out the floor.


Next we used a belt sander to get rid of all the glue and paper residue from the old tiles.  It was sanded down to the bare wood to allow for good adhesion of the new tiles.


The little rotten piece by the door was replaced and some floor leveler to even it out and fill in the cracks.


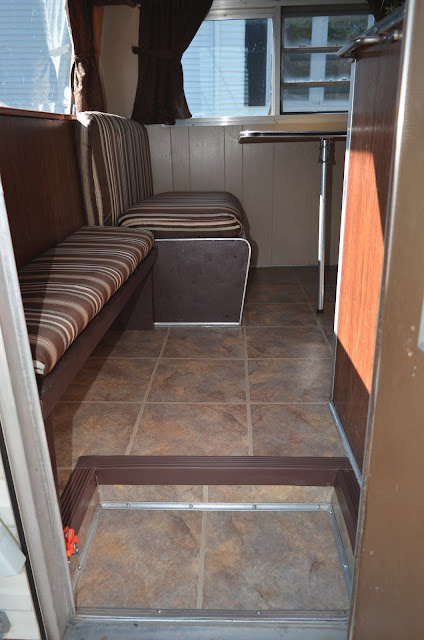
After we let the leveler dry for a day or so, we started sticking down the new tiles.  Below are pics of the finished floor:


One more project complete!


Saturday, April 12, 2014

Making Maple Syrup - Our Fourth Boil - April 11, 2014

Below is our log for our fourth week of sap collecting.

April 7 - 55 cups.  Weather:  High +15.6°C, low 0°C
April 8 - Rain storm.  Dumped sap out.  Weather:  High +11.5°C, low +4.7°C
April 9 - No sap - didn't go below zero last night.  Weather:  High +10.9°C, low +2.2°C
April 10 - 104 cups.  Weather:  High +7°C, low -4.1°C
April 11 - 29.5 cups.  Weather:  High +13.4°C, low +2.9°C

The grand total for our next boil was 188.5 cups, or 11.78 gallons.

This is what the sap looks like at the start of the boil:


And this is what it looks like after five or six hours of boiling:


We boiled for 7 hours, and since we didn't get started until the afternoon it went into the evening.  I ran an extension cord out to the sugar shack so we could put a lamp out there.  It ended up being about midnight by the time we got it bottled.


To save money, Jeff and I have improvised on a lot of materials used for making maple syrup.  The tall thin glass container in the center of the picture is a Bios tea infuser, bought at Canadian Tire for around $11.00.  It is double-walled glass, and works perfectly as a hydrometer cup.

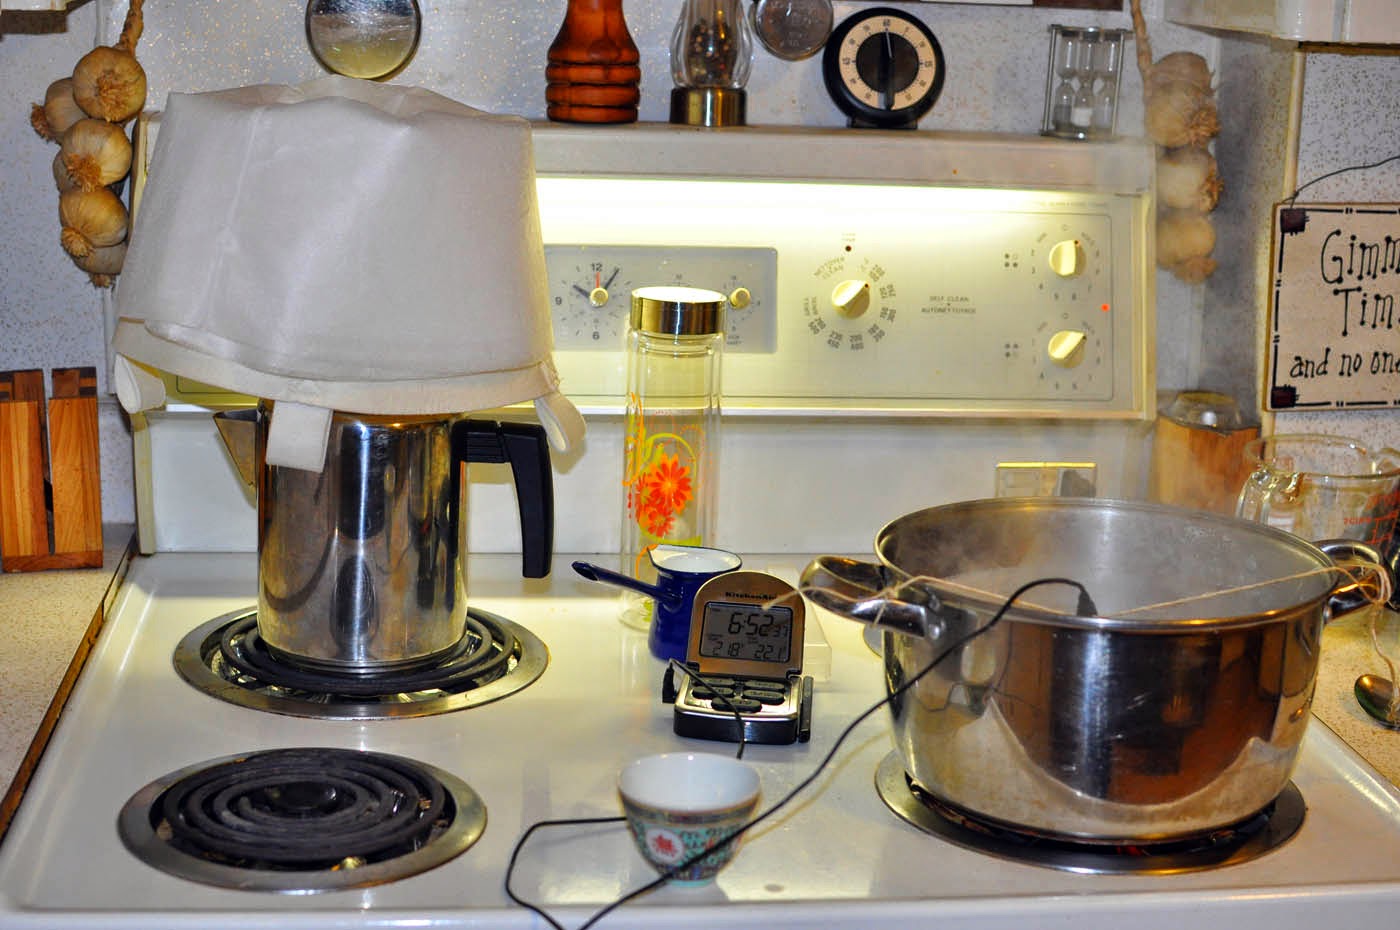
Since we make small batches of syrup each time, we have used our stainless steel coffee percolator to filter the syrup into.  This makes for easy pouring into the funnel for the bottles.


The syrup is almost ready.  It is supposed to be ready at 220°F, but I think our thermometer is not calibrated properly because when we brought it to 220 and tested it with the hydrometer, the syrup is not dense enough and has to be boiled longer.  Through trial and error and a few hydrometer readings, we have found that when it reads 221 and starts to jump to 222 that it is done.  For a properly calibrated thermometer however this would be over-done.


The minimum density for the syrup is 59.6 brix at 211°F.  In the photo below the red line represents 59.6 brix.  It has cooled a bit more in this photo, which makes it more dense.  I have a chart that gives the brix reading according to certain temperatures and we like it a bit more than the minimum density.  Below is the final hydrometer test and I'm satisfied it is now dense enough for bottling.


To ensure proper sterilization the syrup must be bottled at a temperature of no less than 180°F.  I try to aim for 185°F.  At about 190°F niter (or sugar sand) will re-form and the syrup will need to be filtered again so we want to make sure that doesn't happen.  You lose a lot of syrup through the filtering process.

I put my bottles and coffee percolator in the oven at 200°F.  That way when we transfer the syrup from the finishing pot to the percolator the temperature drop is minimized.  The filtering takes some time however and the temperature will usually drop below 180°F.  So once the filtering is complete, I put the percolator back in the oven with the thermometer in it and bring it back up to 185°F.  Then I pour it into the bottles, and lay the bottles on their sides for a few minutes to sterilize the caps.  This sterile bottling method means the syrup will keep for about a year if unopened.  Once opened it will keep in the fridge for about six months.

Syrup that is not brought to the minimum density will spoil, and mold can form in the neck of the bottles where there is a small pocket of air.  This can also happen if the syrup is not bottled in a sterile manner as described above.  If the syrup is too dense, sugar crystallization will occur.

Below is is our produce from our fourth boil, 3 1/2 cups of syrup.


Below are samples of our syrup from our second, third and fourth boils.  The syrup gets darker as the season progress.


The temperatures are remaining above zero quite often now so we're not sure if we will be having another boil.  The sap goes "buddy" once the trees start to metabolize the sugar, which produces a very unpleasant bitter taste.  Since we are new to this I don't know if we'll be able to smell or taste the "buddyness" in the sap.


Sunday, April 6, 2014

Making Maple Syrup - Our Third Boil - April 6, 2014

Below is our log for our third week of sap collecting.

April 1 - Ice storm - never got above zero.  No sap collection.  Weather:  High -1.7°C, low -3.7°C
April 2 - Did not collect today as the sap was slow.  Weather:  High +3.7°C, low -3.9°C
April 3 - 59.5 cups + thawed sap previously frozen of 11.5 cups.  Weather:  High +6.2°C, low -0.9°C
April 4 - 86 cups.  Weather:  High +10°C, low -0.5°C
April 5 - 86.25 cups.  Weather:  High +5.4°C, low -0.6°C
April 6 - 17.75 cups.  Weather:  Cold and windy (W and NW wind).  High +5.3°C, low -0.8°C

The grand total for our next boil was 261 cups, or 16.3 gallons.

Here is Mother Nature's idea of an April Fools joke:


Wicked ice storm on April 1st and our backyard Norway Maple lost a few limbs.  A big one hit the clothesline on the way down and pulled the clothesline support out of the house.  Anyway, back to the sugar shack.  The orange bin is our sap storage container, and it has to be kept cool or it will spoil so we pack it with snow.  Packed like this it will be good for about a week.


On April 4th our new sap hydrometer arrived.  I was not able to use the glass syrup hydrometer cup because the sap hydrometer is much bigger.  So Jeff went to Home Hardware and got a piece of PVC pipe cut to size with a cap on the end and it worked perfectly.  

We tested all the trees individually.  Our lowest sugar content came from the tree in our front yard, a Norway Maple (we think).  It is a fairly young tree, and is probably smaller than the recommended size of 10-12" in diameter to be tapped.  On this date the sap of that tree only had 1.5% sugar.  Our best tree was in our neighbour's yard across the street.  Her tree was at 3.1% sugar, and we have one other tree at 3%.  The other trees range from 1.8% to 2.6%.


I also decided to test the sap in the storage container that we had collected before the sap hydrometer arrived.  It tested at 2.1%, so that was pretty good.


As I mentioned in my previous post, I wanted to try and make the propane burner more efficient.  We had some cinder blocks out by the deck so we surrounded the burner with the blocks to help contain the heat.  It helped a little, but not much, as heat was able to escape around the edges of the pan.  It still only boiled off slightly more than one gallon an hour.  We really need a steam pan that is square and completely covers the top of the burner.  

We started the boil on April 5th, and boiled for five hours then shut it down to go to bed.  At midnight we just put the lid on it and called it a day.


The next day, Sunday, we resumed boiling for another 10 hours.  Jeff brought his laptop out to work on video while boiling.  The smaller pot is our "pre-heater" for sap.  The cold sap from the bin is first heated on a small propane one-burner stove before it is transferred to the big pan.  That way there is no pausing of the boiling in the big pan - it is a continuous rolling boil.


I put a couple of rocks I had in the yard up against the open side of the burner to try and help insulate it a bit more.


After ten hours of boiling outdoors, it is brought inside and transferred to the finishing pot.  It's really starting to look and smell like syrup now.


 When it has reached a temp somewhere between 220 and 221, we take it off the heat and do a hydrometer test.  This time I heated the hydrometer cup in the oven to maintain the hot test temperature of 211.  It is measuring right at 59 brix which is considered done but not as "done" as I would have liked.  But rather than risk overdoing it, we're calling it done.


This boil produced about 6.3 cups of syrup, but again we had issues with filtering where we lost a bunch.  After filtering through the Orlon filter and pre-filter I could still see sugar sand (niter) suspended in the syrup.  So we tried running it through coffee filters.  It plugged up too quickly so we had to re-filter it through the Orlon and pre-filter again.  We lost so much syrup in the filters!  And then after the fact, I read on a maple sugaring forum that you are supposed to dampen the Orlon filter first so it doesn't absorb so much syrup.  Damn!  

And despite all of our filtering and loss of syrup, there was still niter suspended in the syrup.  I also read after the fact that it is nearly impossible to remove all the niter with gravity filters.  The only way to remove it all was with commercial filter presses which are very expensive and not for the hobbyist (unless you have lots of money).  Most hobbyists just let the niter settle to the bottom and in about a week the syrup will look clear.  The niter is harmless...the syrup just looks nicer without it.  Our first batch didn't have it because early season sap has less niter and what was there was caught by the coffee filter.  Niter increases as the season progresses though, and it is also what gives the syrup a darker colour and stronger maple flavour.

So after all that, this is what we were left with.  Our second boil syrup is the lighter-coloured one on the left (1 cup).  The next bottle which is slightly darker is from this boil, also 1 cup.  The little bottle was leftover (2/3 cup), and the large bottle is 2 cups.  So we lost about 2.5 cups of syrup in the filtering fiasco.  Now we know...filter once, do not obsess about niter. lol 


We had the syrup from the little bottle on our waffles for breakfast and it was yummy.


Sunday, March 30, 2014

Making Maple Syrup - Our Second Boil - March 30, 2014

Below is our log for our second week of sap collecting.

March 23 (suppertime collection) - 16 cups. Weather: Cloudy, high +4.7°C, low -6.8°C
March 24 - No collection - never got above zero.  Weather: Sunny, high -4°C, low -16.2°C
March 25 - No collection - barely got above zero.  Weather: Sunny, high +.7°C, low -13.6°C
March 26 - Brought buckets in due to snowstorm coming.  Thawed out and collected what was in the buckets. - never got above zero.  Got 4 1/2 cups.  Weather: Cloudy and windy.  Blizzard started around 11 a.m., high -4.4°C, low -8.3°C
March 27 - Cold, no sap. Weather:  High +0.5°C, low -7.2°C
March 28 - 15 cups.  Weather:  High +6.6°C, low -5.6°C
March 29 - Forgot to record.  Weather:  High +11.4°C, low -0.6°C
March 30 - 52.5 cups.  Weather:  High +0.5°C, low -1.3°C

Total for next boil:  88 cups/5.5 gallons.  

On March 26th we got a huge snowstorm - at least 40cms.  Here are a couple of pics from the day after:


We've discovered that we have made a newbie mistake by drilling tap holes with the wrong sized drill bit.  The size we needed for our old school spiles is a 7/16 bit.  This appears to be an odd size as none of our bit sets contained it.  So we went with one that was close.  But as the old saying goes, "Close only counts in horseshoes and hand grenades"....and tapping maple trees. lol  "Close" didn't cut it.  The sap is leaking around the spiles and is running down the trees trunks. :(  Some are worse than others and some seemed to have sealed up a bit.  There's nothing we can do but leave them alone and hope for the best.  We had eight or so more trees to tap, so we ordered a proper tapping bit from Home Hardware and it is supposed to arrive on March 27th.

The new tapping bit arrived on March 27th, along with a syrup hydrometer.  On March 28th Jeff tapped the remaining eight or so trees in our neighbours' yards (yes, he got permission first ;)).  It made a huge difference.  The tapping bit may not look much different than a regular bit, but it made a world of difference in ease of going into the tree.


Once the hole is drilled about 2" into the tree, Jeff sticks a twig into the hole to remove any shavings.  Then he places the spile into the hole and gently taps it in.  If you hit it too hard you can split the wood and that will cause sap leakage down the trunk of the tree and it's not good for the tree.  We learned this the hard way.


We're a week past the first day of spring and he has to wear snowshoes. lol


I bought some bucket lids from a maple syrup supplier.  You can see one of them in the pic below.  However we still have the problem of rain running down the tree trunks, down the spile and into the buckets.  


Our next boil took about 5.5 hours.  Below is the final stage when it is brought into the house and finished on the stove.


When it starts to foam up like this that is a good sign it is just about ready.  The boiling point of water was 213°F today (it must be checked with every boil because it changes due to atmospheric conditions).  The sap becomes syrup when it reaches 7.1°F above the boiling point of water, so we are aiming for a temp of 220.1°F.  That is for the minimum density.  We like our syrup a bit thicker so we are going to aim for 220.6.  Unfortunately my digital thermometer does not read in tenths, only whole numbers, so after 220 it becomes a guessing game. 


Once we feel it has reached the right temperature, we take it off the heat and pour some syrup into a hydrometer cup.  The cup I'm using for the hydrometer is a Bios glass bottle tea infuser I got from Canadian Tire.  It is tall and double-walled glass, so it is the perfect thing for a hydrometer cup.  The hydrometer measures the density of the syrup.  The density is measured in "brix" (or % sugar) and the syrup has to be a minimum of 66.50 brix at room temperature for a cold test, or about 59.6 brix at a temp of 202°F for a hot test, which is about what it cools down to once it is poured into the hydrometer cup.  The red line on the hydrometer is marked for 59 brix at 211°F. Below you can see that the red line on the hydrometer is just above the syrup line, at about 59.7 brix.  Close enough!


Now that the syrup is done, it must be filtered and bottled hot.  I have pre-sterilized the bottle, and the syrup has to be poured in while it is still at a temperature between 180-190°F.  Anything less than 180°F and it could spoil.  Since we only have a small amount of syrup, I'm using a coffee filter here.  In this early season batch of light syrup there is very little sugar sand, called "niter", so the syrup came out crystal clear.


Below, the final product - 250ml.  This was produced from 5.5 gallons of sap.  We lost about another 1/4 cup due to filtering as I had squeezed the filter the first time and introduced sediment back into the bottle so I refiltered it again (making lots of mistakes and learning lessons for next year! lol).  Doing the math, I figured out that our sap only had a 1.22% sugar content in our sap which is not good.  I have read that early in the season the trees can be lower in sugar content and that it gains as the season progresses.  Or, we could have rain water diluting the sap.  I have to order a sap hydrometer so we can check the sugar content of the sap from each tree, and also if it rains we can check the sap to see if it has become diluted with rain water before wasting the time and fuel boiling it.  Anyway, this bottle I believe would be graded as Canada #1 Extra Light.


It took about 5.5 hours for the boil, which isn't very efficient at 1 gallon per hour.  I think we're going to try and insulate the burner next time using cinder blocks for better efficiency.

I realize this is all a bunch of boring information for anyone reading this, but it's my way of documenting for quick reference in the future when we do this again in other years.  It will be neat to compare weather patterns with sap production after a number of years.